这一节主要讲解springboot安全相关的设置,之前已经做了restful风格的接口,可是这样的接口没有任何安全措施也就是任何人都可以去调用和访问接口这对于系统的安全是有隐患的,这时候就想如果只给特定的人去调用和使用接口就好了,于是就会有授权操作,只有给别人授权那么在令牌到期之前就可以一直访问接口了,甚至我们可以单方面取消授权,这种验证方式也更加灵活简单。
关于oauth2是干啥的这里就不详细说了,可以百度找找资料很多的,这里用oauth2的令牌授权方式来给api接口增加权限认证
授权流程
- 客户端通过账户密码获取令牌采用basic认证获取令牌
- 获取到令牌后,只要客户端携带令牌将对访问的链接放行
目录
1、创建系统用户,角色,oauth2需要的令牌表
在test数据库中创建以下几个表,用户和角色表是用来做security登录验证的,oauth表是securityOauth2需要的表,用来存储令牌信息和和授权信息
create table if not exists oauth_access_token
(
	token_id varchar(256) null,
	token blob null,
	authentication_id varchar(256) null,
	user_name varchar(256) null,
	client_id varchar(256) null,
	authentication blob null,
	refresh_token varchar(256) null
);

create table if not exists oauth_refresh_token
(
	token_id varchar(256) null,
	token blob null,
	authentication blob null
);

create table if not exists sys_role
(
	id char(32) not null,
	name varchar(50) null,
	constraint sys_role_id_uindex
		unique (id)
);

alter table sys_role
	add primary key (id);

create table if not exists sys_user
(
	username varchar(50) not null,
	email varchar(50) null,
	password varchar(500) null,
	activated tinyint null,
	activationkey varchar(50) null,
	resetpasswordkey varchar(50) null,
	id char(32) not null,
	constraint sys_user_id_uindex
		unique (id)
);

alter table sys_user
	add primary key (id);

create table if not exists sys_user_role
(
	id char(32) not null,
	user_id char(32) null,
	role_id char(32) null,
	constraint sys_user_role_id_uindex
		unique (id)
);

alter table sys_user_role
	add primary key (id);

INSERT INTO test.sys_user (username, email, password, activated, activationkey, resetpasswordkey, id) VALUES ('admin', 'admin@qq.com', '$2a$10$ug52RdvAYvbklZmj1eGXme/1wTrs.35.TuiXtMB4TNR2mySFOTo5C', 1, null, null, '1');

INSERT INTO test.sys_role (id, name) VALUES ('1', 'ROLE_ADMIN');
INSERT INTO test.sys_role (id, name) VALUES ('2', 'ROLE_USER');

INSERT INTO test.sys_user_role (id, user_id, role_id) VALUES ('1', '1', '1');
2、项目引入springSecurity和securityOauth2依赖
在项目pom文件中追加以下两个依赖
        <!-- spring安全组件 -->
        <dependency>
            <groupId>org.springframework.boot</groupId>
            <artifactId>spring-boot-starter-security</artifactId>
        </dependency>
        <!-- oauth2.0支持组件 -->
        <dependency>
            <groupId>org.springframework.security.oauth</groupId>
            <artifactId>spring-security-oauth2</artifactId>
            <version>2.1.4.RELEASE</version>
        </dependency>
3、创建客户端id和秘钥配置文件
在resources目录下创建config.properties文件,用来存放客户端id和秘钥
authentication.oauth.clientid=apg
#authentication.oauth.secret=apg_secret
authentication.oauth.secret=$2a$10$vx968kRRkKhQQRZhilHxwOp6MQyOO5lUyKQAk0AbuWvLsJxj/AkJi
#单位是秒 令牌过期时间
authentication.oauth.tokenValidityInSeconds=1800
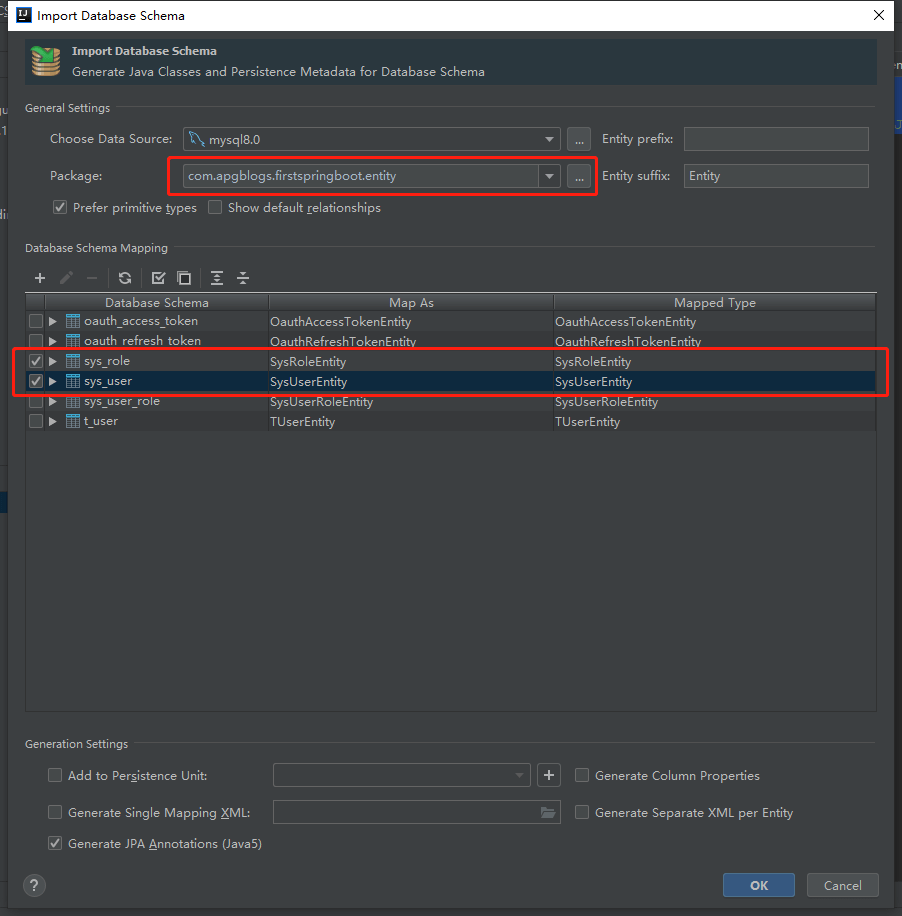
4、映射系统用户和系统角色实体类
如何使用jpa映射实体类到包中,可以参考以下的一篇文章
映射用户和角色到entity包中
在SysUserEntity中添加角色列表的关联查询,完整代码如下
package com.apgblogs.firstspringboot.entity;

import javax.persistence.*;
import java.util.Objects;
import java.util.Set;

/**
 * @author xiaomianyang
 * @description
 * @date 2019-05-15 13:00
 */
@Entity
@Table(name = "sys_user", schema = "apg", catalog = "")
public class SysUserEntity {
    private String username;
    private String email;
    private String password;
    private Byte activated;
    private String activationkey;
    private String resetpasswordkey;
    private String id;
    private Set<SysRoleEntity> sysRoleEntities;

    @Basic
    @Column(name = "username")
    public String getUsername() {
        return username;
    }

    public void setUsername(String username) {
        this.username = username;
    }

    @Basic
    @Column(name = "email")
    public String getEmail() {
        return email;
    }

    public void setEmail(String email) {
        this.email = email;
    }

    @Basic
    @Column(name = "password")
    public String getPassword() {
        return password;
    }

    public void setPassword(String password) {
        this.password = password;
    }

    @Basic
    @Column(name = "activated")
    public Byte getActivated() {
        return activated;
    }

    public void setActivated(Byte activated) {
        this.activated = activated;
    }

    @Basic
    @Column(name = "activationkey")
    public String getActivationkey() {
        return activationkey;
    }

    public void setActivationkey(String activationkey) {
        this.activationkey = activationkey;
    }

    @Basic
    @Column(name = "resetpasswordkey")
    public String getResetpasswordkey() {
        return resetpasswordkey;
    }

    public void setResetpasswordkey(String resetpasswordkey) {
        this.resetpasswordkey = resetpasswordkey;
    }

    @Id
    @Column(name = "id")
    public String getId() {
        return id;
    }

    public void setId(String id) {
        this.id = id;
    }

    @ManyToMany
    @JoinTable(
            name="sys_user_role",
            joinColumns = @JoinColumn(name="user_id"),
            inverseJoinColumns = @JoinColumn(name="role_id")
    )
    public Set<SysRoleEntity> getSysRoleEntities() {
        return sysRoleEntities;
    }

    public void setSysRoleEntities(Set<SysRoleEntity> sysRoleEntities) {
        this.sysRoleEntities = sysRoleEntities;
    }

    @Override
    public boolean equals(Object o) {
        if (this == o) return true;
        if (o == null || getClass() != o.getClass()) return false;
        SysUserEntity that = (SysUserEntity) o;
        return Objects.equals(username, that.username) &&
                Objects.equals(email, that.email) &&
                Objects.equals(password, that.password) &&
                Objects.equals(activated, that.activated) &&
                Objects.equals(activationkey, that.activationkey) &&
                Objects.equals(resetpasswordkey, that.resetpasswordkey) &&
                Objects.equals(id, that.id);
    }

    @Override
    public int hashCode() {
        return Objects.hash(username, email, password, activated, activationkey, resetpasswordkey, id);
    }
}
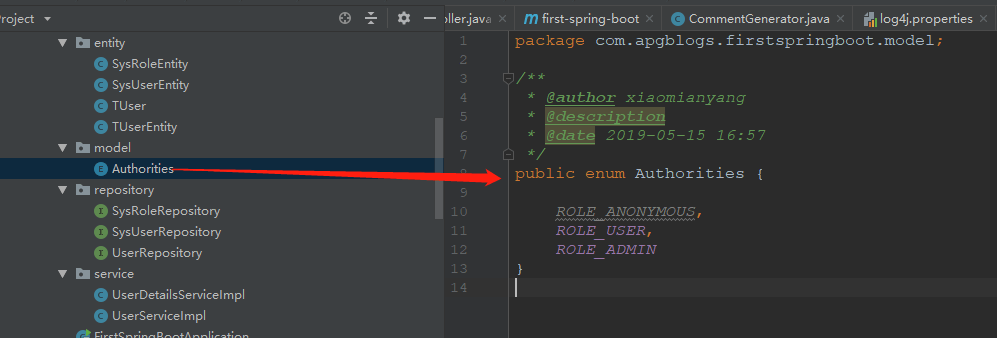
5、创建权限模型
在项目中创建model包,并创建一个权限枚举类
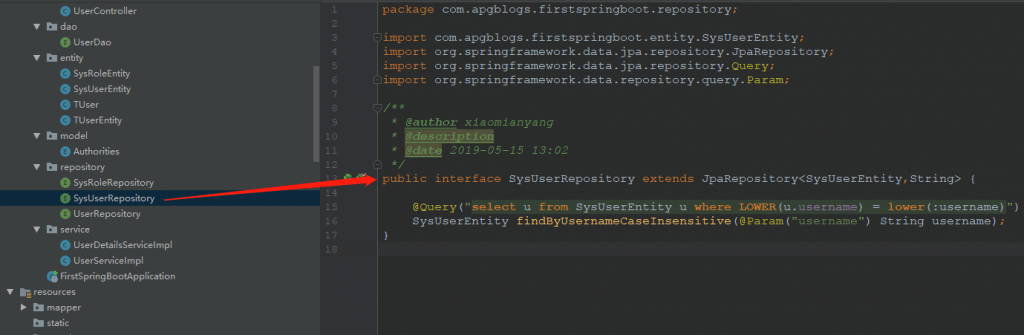
6、创建系统用户和角色Repository
角色里面只要集成jpa的接口就可以了,不用学查询方法,用户repository里面添加一个通过用户名查询用户实体的方法
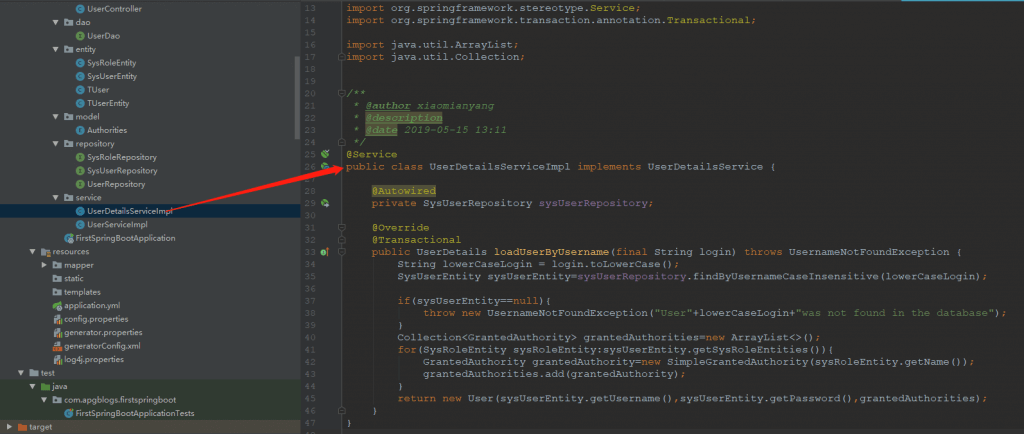
7、创建springSecurity UserDetailsService实现类,用来做登录认证
此类实现 UserDetailsService 接口,用来自定义用户和角色的来源
package com.apgblogs.firstspringboot.service;

import com.apgblogs.firstspringboot.entity.SysRoleEntity;
import com.apgblogs.firstspringboot.entity.SysUserEntity;
import com.apgblogs.firstspringboot.repository.SysUserRepository;
import org.springframework.beans.factory.annotation.Autowired;
import org.springframework.security.core.GrantedAuthority;
import org.springframework.security.core.authority.SimpleGrantedAuthority;
import org.springframework.security.core.userdetails.User;
import org.springframework.security.core.userdetails.UserDetails;
import org.springframework.security.core.userdetails.UserDetailsService;
import org.springframework.security.core.userdetails.UsernameNotFoundException;
import org.springframework.stereotype.Service;
import org.springframework.transaction.annotation.Transactional;

import java.util.ArrayList;
import java.util.Collection;


/**
 * @author xiaomianyang
 * @description
 * @date 2019-05-15 13:11
 */
@Service
public class UserDetailsServiceImpl implements UserDetailsService {

    @Autowired
    private SysUserRepository sysUserRepository;

    @Override
    @Transactional
    public UserDetails loadUserByUsername(final String login) throws UsernameNotFoundException {
        String lowerCaseLogin = login.toLowerCase();
        SysUserEntity sysUserEntity=sysUserRepository.findByUsernameCaseInsensitive(lowerCaseLogin);

        if(sysUserEntity==null){
            throw new UsernameNotFoundException("User"+lowerCaseLogin+"was not found in the database");
        }
        Collection<GrantedAuthority> grantedAuthorities=new ArrayList<>();
        for(SysRoleEntity sysRoleEntity:sysUserEntity.getSysRoleEntities()){
            GrantedAuthority grantedAuthority=new SimpleGrantedAuthority(sysRoleEntity.getName());
            grantedAuthorities.add(grantedAuthority);
        }
        return new User(sysUserEntity.getUsername(),sysUserEntity.getPassword(),grantedAuthorities);
    }
}
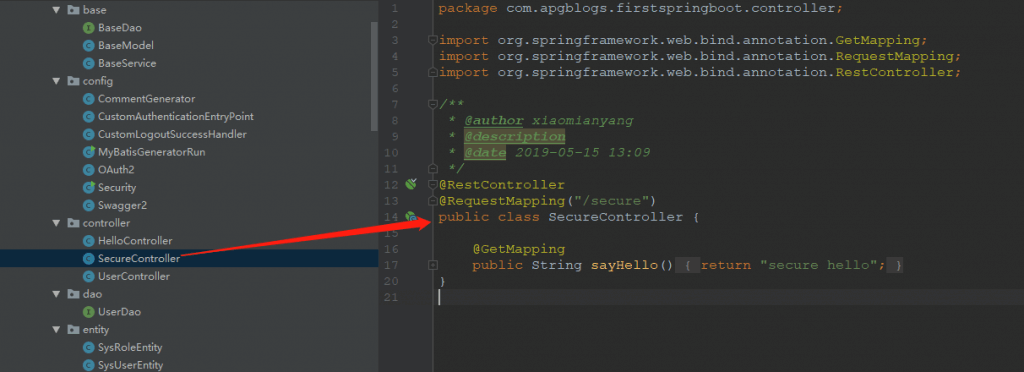
8、创建SecureController,作为一个需要授权的api接口用来做授权测试
此类将通过安全设置只有持有令牌的请求才能访问
修改HelloController,此controller是没有授权验证的也是用来验证授权是否起作用
package com.apgblogs.firstspringboot.controller;

import org.springframework.web.bind.annotation.GetMapping;
import org.springframework.web.bind.annotation.PathVariable;
import org.springframework.web.bind.annotation.RestController;

/**
 * @author xiaomianyang
 * @description
 * @date 2019-06-01 12:37
 */
@RestController
public class HelloController {

    @GetMapping("/hello")
    public String index(){
        return "hello world";
    }

}
9、创建security和oauth2配置类
此处就是重点中的重点,设置安全验证策略以及请求授权策略
在config包中创建以下几个类
- Security spring安全配置类
- OAuth2 授权验证配置类
- CustomAuthenticationEntryPoint 自定义授权失败时的提示内容
- CustomLogoutSuccessHandler 自定义退出成功时删除token
security类(里面的main方法可用来生成用户表用户加密后的密码,apg_secret也是使用此方式生成的)
package com.apgblogs.firstspringboot.config;

import com.apgblogs.firstspringboot.service.UserDetailsServiceImpl;
import org.springframework.beans.factory.annotation.Autowired;
import org.springframework.context.annotation.Bean;
import org.springframework.context.annotation.Configuration;
import org.springframework.security.access.expression.method.MethodSecurityExpressionHandler;
import org.springframework.security.authentication.AuthenticationManager;
import org.springframework.security.config.annotation.authentication.builders.AuthenticationManagerBuilder;
import org.springframework.security.config.annotation.method.configuration.EnableGlobalMethodSecurity;
import org.springframework.security.config.annotation.method.configuration.GlobalMethodSecurityConfiguration;
import org.springframework.security.config.annotation.web.builders.WebSecurity;
import org.springframework.security.config.annotation.web.configuration.EnableWebSecurity;
import org.springframework.security.config.annotation.web.configuration.WebSecurityConfigurerAdapter;
import org.springframework.security.crypto.bcrypt.BCryptPasswordEncoder;
import org.springframework.security.crypto.password.PasswordEncoder;
import org.springframework.security.oauth2.provider.expression.OAuth2MethodSecurityExpressionHandler;

/**
 * @author xiaomianyang
 * @description
 * @date 2019-05-15 15:58
 */
@Configuration
@EnableWebSecurity
public class Security extends WebSecurityConfigurerAdapter {

    @Autowired
    private UserDetailsServiceImpl userDetailsService;

    @Bean
    public PasswordEncoder passwordEncoder(){
        return new BCryptPasswordEncoder();
    }

    @Autowired
    public void configureGlobal(AuthenticationManagerBuilder authenticationManagerBuilder) throws Exception{
        authenticationManagerBuilder.userDetailsService(userDetailsService).passwordEncoder(passwordEncoder());
    }

    @Override
    public void configure(WebSecurity web) throws Exception {
        web.ignoring().antMatchers("/hello");
    }

    @Override
    @Bean
    public AuthenticationManager authenticationManagerBean() throws Exception {
        return super.authenticationManagerBean();
    }

    @EnableGlobalMethodSecurity(prePostEnabled = true,jsr250Enabled = true)
    public static class GlobalSecurityConfiguration extends GlobalMethodSecurityConfiguration{
        @Override
        protected MethodSecurityExpressionHandler createExpressionHandler() {
            return new OAuth2MethodSecurityExpressionHandler();
        }
    }

    public static void main(String[] args) {
        BCryptPasswordEncoder passwordEncoder = new BCryptPasswordEncoder();
        System.out.println(passwordEncoder.encode("admin"));
    }
}
OAuth2类
package com.apgblogs.firstspringboot.config;

import com.apgblogs.firstspringboot.model.Authorities;
import org.springframework.beans.factory.annotation.Autowired;
import org.springframework.beans.factory.annotation.Qualifier;
import org.springframework.beans.factory.annotation.Value;
import org.springframework.context.annotation.Bean;
import org.springframework.context.annotation.Configuration;
import org.springframework.context.annotation.PropertySource;
import org.springframework.security.authentication.AuthenticationManager;
import org.springframework.security.config.annotation.web.builders.HttpSecurity;
import org.springframework.security.oauth2.config.annotation.configurers.ClientDetailsServiceConfigurer;
import org.springframework.security.oauth2.config.annotation.web.configuration.AuthorizationServerConfigurerAdapter;
import org.springframework.security.oauth2.config.annotation.web.configuration.EnableAuthorizationServer;
import org.springframework.security.oauth2.config.annotation.web.configuration.EnableResourceServer;
import org.springframework.security.oauth2.config.annotation.web.configuration.ResourceServerConfigurerAdapter;
import org.springframework.security.oauth2.config.annotation.web.configurers.AuthorizationServerEndpointsConfigurer;
import org.springframework.security.oauth2.provider.token.TokenStore;
import org.springframework.security.oauth2.provider.token.store.JdbcTokenStore;

import javax.sql.DataSource;

/**
 * @author xiaomianyang
 * @description
 * @date 2019-05-15 16:08
 */
@Configuration
public class OAuth2 {

    /**
     * @description 资源配置,配置那些资源是需要授权访问,那些是放行的
     * @author xiaomianyang
     * @date 2019-06-25 13:04
     * @param
     * @return
     */
    @Configuration
    @EnableResourceServer
    protected static class ResourceServerConfiguration extends ResourceServerConfigurerAdapter{

        @Autowired
        private CustomAuthenticationEntryPoint customAuthenticationEntryPoint;

        @Autowired
        private CustomLogoutSuccessHandler customLogoutSuccessHandler;

        @Override
        public void configure(HttpSecurity http) throws Exception {
            http.exceptionHandling()
                    .authenticationEntryPoint(customAuthenticationEntryPoint)
                    .and()
                    .logout()
                    .logoutUrl("/oauth/logot")
                    .logoutSuccessHandler(customLogoutSuccessHandler)
                    .and()
                    .authorizeRequests()
                    .antMatchers("/hello/").permitAll()
                    .antMatchers("/secure/**").authenticated();
        }
    }

    /**
     * @description 授权服务器配置,配置客户端id,密钥和令牌的过期时间
     * @author xiaomianyang
     * @date 2019-06-25 13:05
     * @param
     * @return
     */
    @Configuration
    @EnableAuthorizationServer
    @PropertySource(value ="classpath:config.properties")
    protected static class AuthorizationServerConfiguration extends AuthorizationServerConfigurerAdapter {

        @Value("${authentication.oauth.clientid}")
        private String clientid;

        @Value("${authentication.oauth.secret}")
        private String secret;

        @Value("${authentication.oauth.tokenValidityInSeconds}")
        private int tokenValidityInSeconds;

        @Autowired
        private DataSource dataSource;

        @Bean
        public TokenStore tokenStore(){
            return new JdbcTokenStore(dataSource);
        }

        @Autowired
        @Qualifier("authenticationManagerBean")
        private AuthenticationManager authenticationManager;

        @Override
        public void configure(AuthorizationServerEndpointsConfigurer endpoints) throws Exception {
            endpoints.tokenStore(tokenStore())
                    .authenticationManager(authenticationManager);
        }

        /**
         * @description 配置令牌的作用域和授权方式
         * @author xiaomianyang
         * @date 2019-06-25 13:07
         * @param [clients]
         * @return void
         */
        @Override
        public void configure(ClientDetailsServiceConfigurer clients) throws Exception {
            clients.inMemory()
                    .withClient(clientid)
                    .scopes("read","write")
                    .authorities(Authorities.ROLE_ADMIN.name(), Authorities.ROLE_USER.name())
                    .authorizedGrantTypes("password","refresh_token")
                    .secret(secret)
                    .accessTokenValiditySeconds(tokenValidityInSeconds);
        }
    }

}
CustomAuthenticationEntryPoint 类
package com.apgblogs.firstspringboot.config;

import org.slf4j.Logger;
import org.slf4j.LoggerFactory;
import org.springframework.security.core.AuthenticationException;
import org.springframework.security.web.AuthenticationEntryPoint;
import org.springframework.stereotype.Component;

import javax.servlet.ServletException;
import javax.servlet.http.HttpServletRequest;
import javax.servlet.http.HttpServletResponse;
import java.io.IOException;

/**
 * @author xiaomianyang
 * @description
 * @date 2019-05-15 16:11
 */
@Component
public class CustomAuthenticationEntryPoint implements AuthenticationEntryPoint {

    private final Logger logger= LoggerFactory.getLogger(CustomAuthenticationEntryPoint.class);

    public void commence(HttpServletRequest request,
                         HttpServletResponse response,
                         AuthenticationException ae) throws IOException, ServletException {
        logger.info("Pre-authenticated entry point called Rejecting access");
        response.sendError(HttpServletResponse.SC_UNAUTHORIZED,"Access Denied");
    }
}
CustomLogoutSuccessHandler类
package com.apgblogs.firstspringboot.config;

import org.springframework.beans.factory.annotation.Autowired;
import org.springframework.security.core.Authentication;
import org.springframework.security.oauth2.common.OAuth2AccessToken;
import org.springframework.security.oauth2.provider.token.TokenStore;
import org.springframework.security.web.authentication.AbstractAuthenticationTargetUrlRequestHandler;
import org.springframework.security.web.authentication.logout.LogoutSuccessHandler;
import org.springframework.stereotype.Component;

import javax.servlet.ServletException;
import javax.servlet.http.HttpServletRequest;
import javax.servlet.http.HttpServletResponse;
import java.io.IOException;

/**
 * @author xiaomianyang
 * @description
 * @date 2019-05-15 16:15
 */
@Component
public class CustomLogoutSuccessHandler extends AbstractAuthenticationTargetUrlRequestHandler implements LogoutSuccessHandler {

    private static final String BEARER_AUTHENTICATION="Bearer";
    private static final String HEADER_AUTHORIZATION="authorization";

    @Autowired
    private TokenStore tokenStore;

    @Override
    public void onLogoutSuccess(HttpServletRequest httpServletRequest, HttpServletResponse httpServletResponse, Authentication authentication) throws IOException, ServletException {
        String token=httpServletRequest.getHeader(HEADER_AUTHORIZATION);
        if(token!=null && token.startsWith(BEARER_AUTHENTICATION)){
            OAuth2AccessToken oAuth2AccessToken=tokenStore.readAccessToken(token.split(" ")[0]);
            if(oAuth2AccessToken!=null){
                tokenStore.removeAccessToken(oAuth2AccessToken);
            }
        }
    }
}
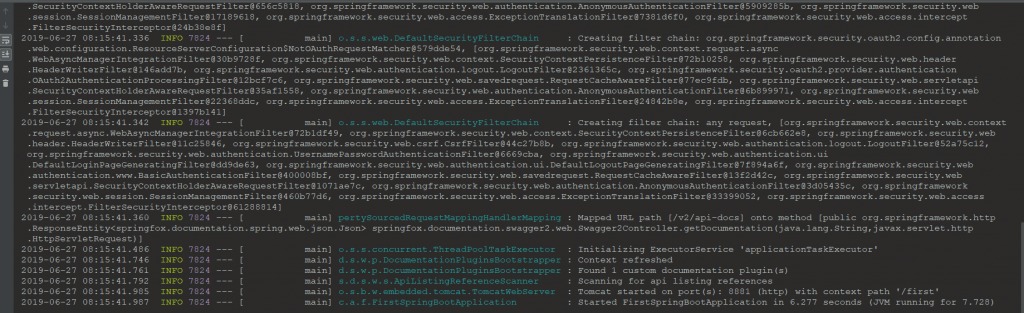
10、启动项目
现在所有都已经准备就绪,可以启动项目进行测试了
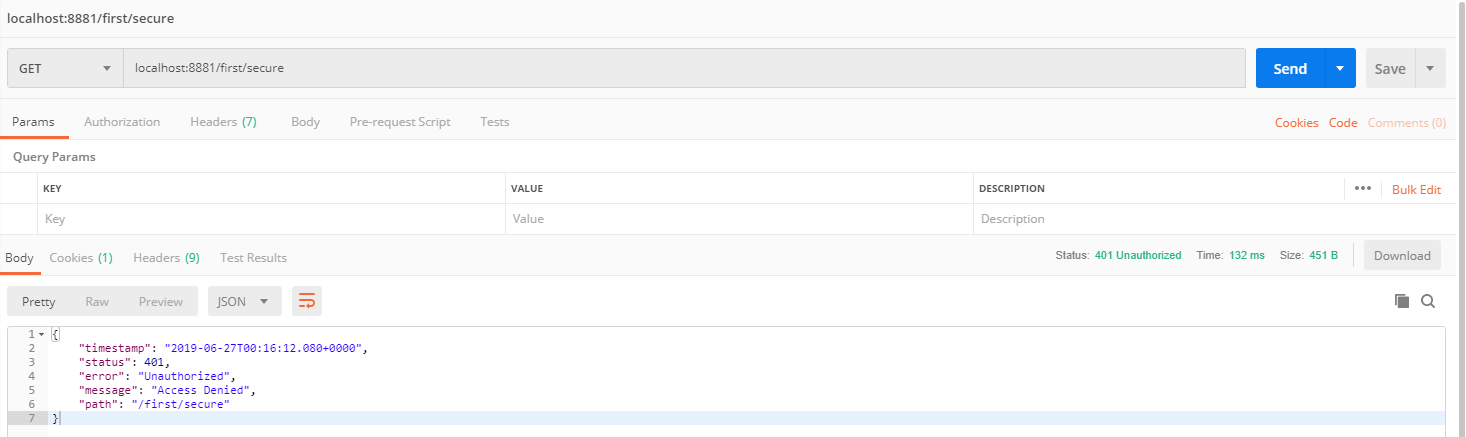
11、使用postman工具进行授权测试
先访问secureController中的地址,看看提示什么?
提示以下未授权,那说明此地址已经被加了安全验证了
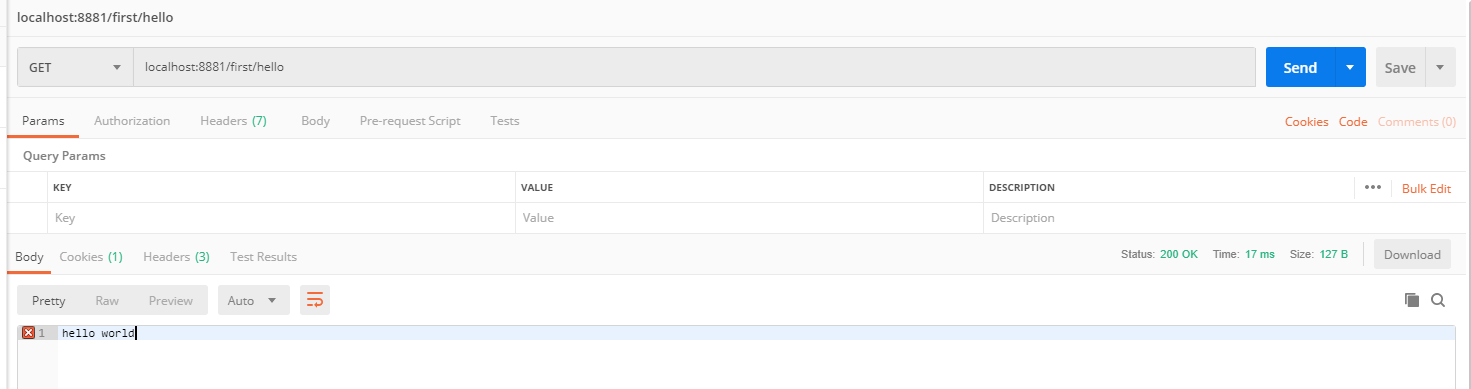
在访问hello试试
可以正常显示结果,这个地址并未加安全验证,那说明也对了
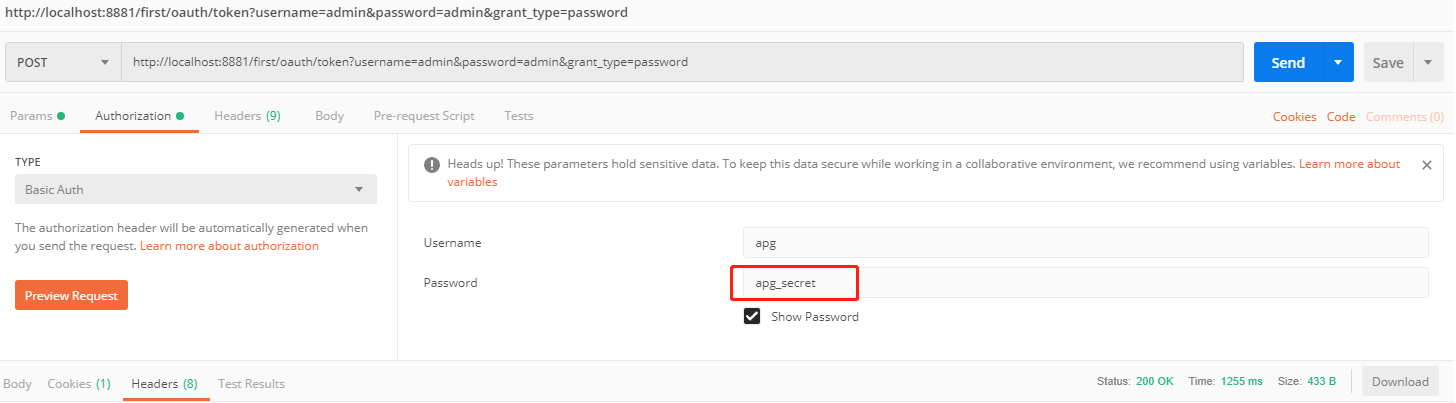
那怎么有权限访问secure地址呢,需要先获取一个令牌,如何获取令牌呢?
用post请求的方式传入用户表里面的账号和明文密码,以及授权类型,这些都在后台有配置,还有一个关键的就是basic认证,就是后端配置文件里面的id和secure,这里的secure使用明文,后端会加密和配置文件中的密文匹配
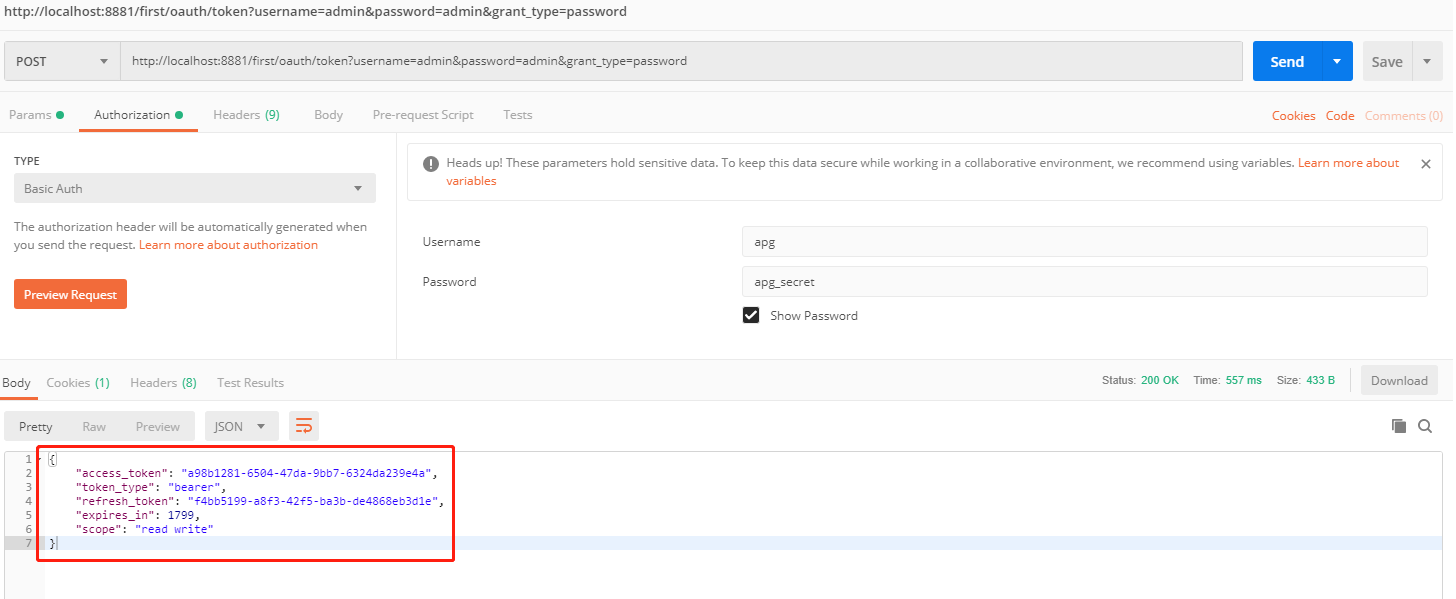
请求成功后,会获得令牌的基本信息
- access_token 就是令牌key,需要授权的链接都需要携带此key访问
- token_type 令牌类型,意思是发门票的方式授权
- refresh_token 是刷新令牌,如果令牌过期了可以使用此key刷新获得一个新令牌
- expires_in 令牌过期时间,如果重复执行以下请求,时间将减少
- scope 令牌的权限作用域,意思这个令牌具有啥权限,这里是可读可写
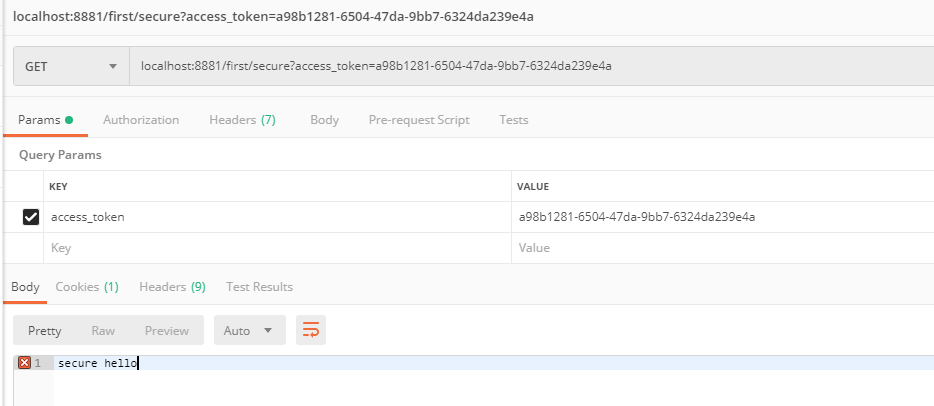
再次访问secure并携带access_token看看
发现已经认证通过了,并且获取到了结果
接下来在测试下refreshToken看看
可以看到又获取到了一个新的而且没过期的令牌了
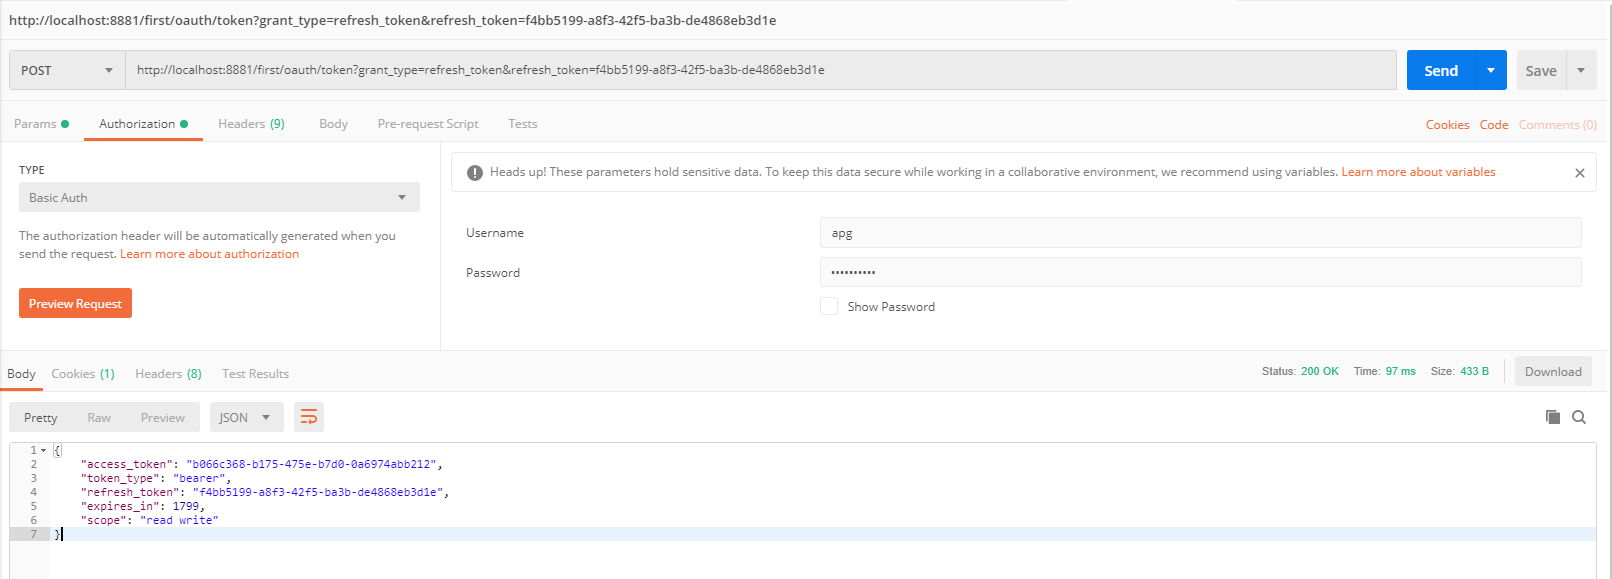
那如果令牌被刷新了,在用之前的令牌访问secure会出现啥呢,这个就可以自己测试一下了
12、文章源码地址
码云: https://gitee.com/apgblogs/springBootStudy
现在springBoot就已经完整的继承了oauth2的授权认证功能,这样api接口就有了授权才可以访问的限制,不是人人都可以随时调用的了,更多而关于oauth2的策略可以看源码或者看官网文档说明
如果感觉文章看着不清楚的后面会有对应的视频教程以及项目代码将会放在springBoot视频区,感谢阅读,觉得不错的就留言支持支持吧。